


Custom Search
Howdy, Stranger!
It looks like you're new here. If you want to get involved, click one of these buttons!
Categories
- 3.4K All Categories
- 35 Nikon Z lenses
- 83 Nikon Z cameras
- 1.4K Nikon DSLR cameras
- 11 Df
- 237 D6x0/D7x0/D8x0
- 27 D300/D300s/D500
- 29 D3x00
- 45 D3/D4/D5
- 31 D5x00
- 95 D90/D7x00
- 388 Nikon Lenses
- 9 Videos, Nikon et. al.
- 52 Nikon 1
- 18 Nikon Film Cameras
- 56 Nikon Flashes
- 25 Nikon Compact Cameras
- 49 Nikon Software
- 26 Nikon Deals
- 768 General Discussions
- 49 Gear Reviews
- 182 Other Manufacturers
- 105 Fun & Weird
- 128 Photo-a-day
Who's Online (0)
Post processing
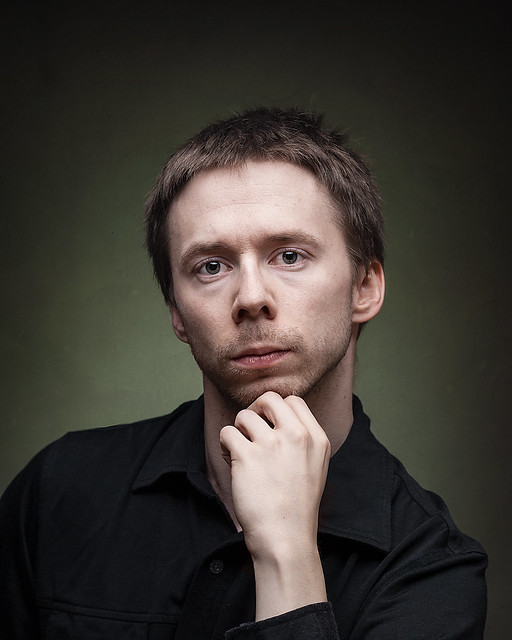
I got a question from Gabb (is that your name here on the new forum as well) on my flickr about the processing on the latest self portrait I posted in the PAD. I promised I would get to him once I had figured out what I actually did  So, I edited a second portrait and made sure to note each step. Gabb suggested I should post it here in case anyone else was interested. Below is the portrait in question.
The programs I used to edit it was Lightroom 4 and Perfect Photo Suite 7. If you have photoshop then this guide might be of help as well: http://phlearn.com/dan-winters-style-photo-shoot. I used that as a starting point and then tried to translate the techniques from that to the programs I were using.
I didn't do much in Lightroom to start with, just added a bit of contrast and vibrance. I then started working on the background and the first thing I did was to use the focal point module to drop focus and get rid of the wrinkles from the grey bed sheet I used. If you're shooting on a proper seamless paper you should be able to skip this step. Next I brought it into perfect effects and added a texture (the one I used is called crumbled paper). I brought down the opacity to around 40 (I think).
The next thing I did was to slightly whiten and add detail to the eyes in perfect portrait. Here I also evened the skin tones slightly and got rid of a couple of blemishes. Other than that I left the skin intact.
Next I did a very minor tweak i perfect effects by using the cool shadow preset. I think the opacity was at 8 or 9 so it's hardly noticeable, I just like the subtle effect of cooler shadows.
The next effect I added is probably one of the more important ones and it's one called amazing detail (we're still in perfect effects here). I think it does a much better job of adding detail than, for example, clarity in Lightroom.
The final effect was a vignette, I used the subtle vignette preset.
Next up is a trip to perfect layers where I had prepared two additional layers that I created in Lightroom. For the first one I simply used the black and white blue channel preset that comes in Lightroom, didn't change anything. The second one was also from the blue channel but here I pulled down blacks, shadows and exposure until most of the image was more or less black, except for the highlights on the face.
I blended the first layer with normal mode until I got a saturation I liked (around 15 opacity I think). For the second layer I used screen mode and masked it so it only affected the skin parts (face and hand). What that did was to whiten the highlights in a nice way. Play around with the opacity until you get something that looks good, I ended up at around 30. These two steps are a very big part in all this.
If you're wondering why I used the blue channel preset instead of a plain b&w conversion, it's because it adds a bit extra contrast and tonality to the shadows.
Ok, we're done in Perfect Photo Suite, back to Lightroom. The final layer we did lightened the highlights quite a bit so I pulled them back down a bit. I also pulled up the shadows to get some more detail there. I added some clarity, though you can probably skip that, depending on what you're going for. I also pulled up the vibrancy quite a bit to bring back a bit of the punch in the colours that we lost before.
The most important part done in Lightroom was the tweaking of individual colour channels for hue and saturation. I pulled down saturation just a tad on the red and orange channels ( also pulled down blue quite a lot to lose the tint on the shirt). For hue I pulled the red and orange a bit more towards yellow and the yellows also got a small push toward green. I also tweaked the green channel to put a final touch on the background.
Crop and done.
I hope this can be of some help if anyone bothered reading the whole thing (sorry about the length). The last few weeks I've been trying to teach myself a bit more about post processing since I've always felt that it's one of my weakest areas, so I know what it's like to not get the results you want (I still very seldom do).
I haven't proof read this so I apologize in advance for any confusion caused
/Rifqi
Disclaimer: This site has no affiliation with Nikon Corporation or any of its subsidiary.
Disclosure: [NR] is sponsored by displaying advertising banners and links.
All trademarks and brands belong to their respective owners.
Want to advertise on NikonRumors.com? Contact [NR].
Copyright © 2008-2017 NikonRumors.com.
See our Privacy Policy.
Disclosure: [NR] is sponsored by displaying advertising banners and links.
All trademarks and brands belong to their respective owners.
Want to advertise on NikonRumors.com? Contact [NR].
Copyright © 2008-2017 NikonRumors.com.
See our Privacy Policy.
Comments
Keep up the good work.